4 Cozy Reading Nooks You’ll Want in Your Home Right Now Constructing a reading nook doesn’t have to be hard. Sometimes all you need is lots of pillows and a little unused space. Reading nooks are also a great way to use dead, unused, or awkward space within a home. Nooks can help maximize living space and provide additional seating, along with providing a personal sanctuary. With these four easy DIY reading nook projects, it won’t be long before you find yourself dreaming of getting lost in a good book. 1. Make Use of Dead Space with a Corner Bench Do you have a dead corner in your house that’s just…there? A great remedy for that empty space is a corner bench. Creating an L-shaped bench will maximize your space. Not only will it provide additional seating, but it can also become storage. Create this bench with bookshelves, cushions, and pillows for the ultimate reading nook space. When the bookshelves are placed together, you can then determine what size cushion you will need to go on ...
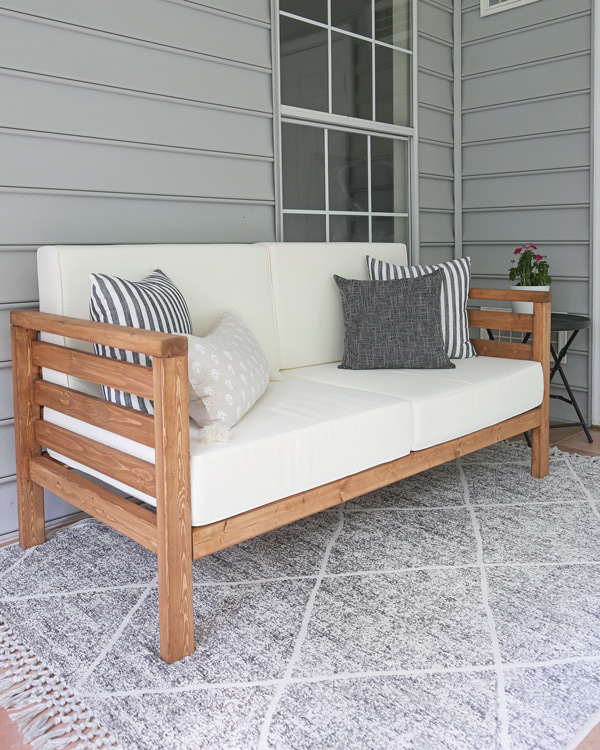
HOW TO BUILD A DIY OUTDOOR COUCH:
MATERIALS:
- (8) 2×3 @ 8ft (framing lumber)
- (2) 1×3 @ 8ft
- 2 1/2″ Deck Screws (optional – see step #2)
- 2″ brad nails
- 2 1/2″ Kreg screws (weather resistant)
- Stainable wood filler
- (2) sets of outdoor cushions
- Exterior wood stain
1. MAKE CUTS FOR OUTDOOR COUCH FRAME
Use a miter saw and make the following cuts from the 2x3s:
- 4 pieces @ 24 1/2″ (for side frames)
- 2 pieces @ 30 1/4″ (for side frames)
- 5 pieces @ 57 1/2″ (for back & front frames)
- 8 pieces @ 27 1/4″ (for side & bottom frames)
2. ASSEMBLE DIY OUTDOOR COUCH SIDE FRAMES
Add two pocket holes with the Kreg Jig to each end of two of the 27 1/4″ pieces.
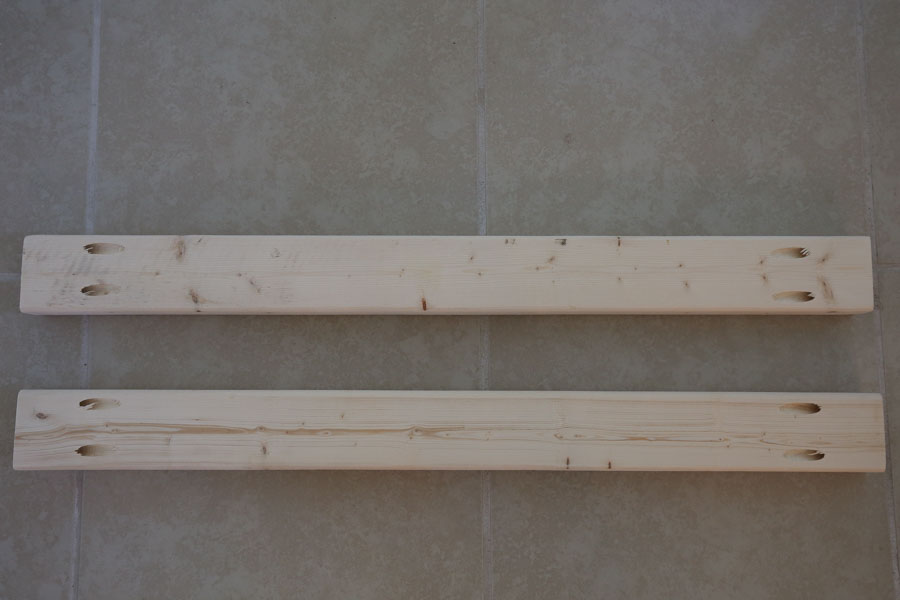
Mark 10″ up from the bottom of one of the 24 1/2″ pieces (on the edge of it). Attach one of the 27 1/4″ pieces perpendicularly to the 24 1/2″ piece at the 10″ mark.
Make sure to attach it so the edge of the 27 1/4″ piece is flush with the top edge of the 24 1/2″ piece as shown in the below photo. I used a scrap 1×2 and paint stick underneath of the board to help with this part!
Then attach the two together with 2 1/2″ Kreg screws. Repeat this process on the other side of the 27 1/4″ piece. Once complete your side frame piece will look like this:

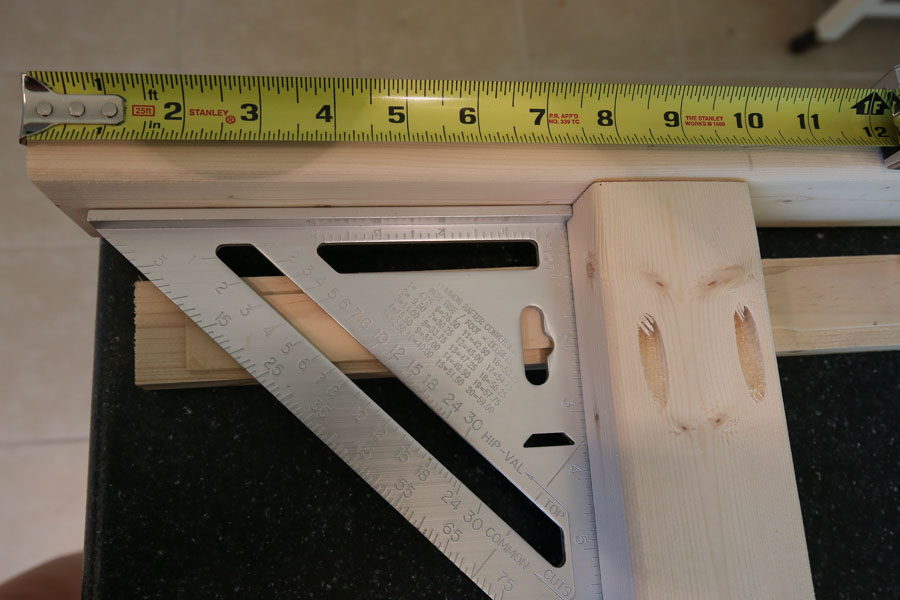
Next, attach one of the 30 1/4″ boards to the top of the frame with 2 1/2″ deck screws and so they are countersunk beneath the wood surface (you will fill them with wood filler later).
I forgot to get deck screws, so I just used Kreg screws instead, which works too!
To do this, I used a 3/8″ drill bit and drilled a shallow hole, just deep enough to cover my screw head. Then, I drilled my pilot hole inside of that larger hole with a smaller bit for the Kreg screw. Lastly, I drilled in my Kreg screw to attach the two boards.

Repeat on the back of the side frame piece and then your side frame is complete!

Repeat the above process to create the second side frame piece for your DIY outdoor couch.
3. ADD SIDE SLAT BOARDS TO SIDE FRAMES
Now it’s time to add the horizontal slat boards to the side frames. This step is totally optional. These slats are more a decorative feature than structural. I think they make the DIY outdoor sofa look really cool and will help prevent throw pillows from falling out the sides!
Measure the exact distance between the two legs of the side frames and cut three 1x3s to this size. The measurements should be close to 27 1/4″ but since we’re working with framing lumber, they will probably be a little different.
Each of my three slats were a little different in size, so make sure to measure exactly where the board is going. The boards should be spaced out 1 3/4″ from each other:

Attach the 1×3 slat boards with a brad nailer and 2″ brad nails.


Repeat the above process for the second side frame.
4. ASSEMBLE BOTTOM FRAME OF DIY OUTDOOR SOFA
Add pocket holes to both ends of the remaining 6 boards @ 27 1/4″ AND to the ends of the 5 boards @ 57 1/2″.
Then use Kreg screws and attach four of the 27 1/4″ boards perpendicularly to two of the 57 1/2″ boards as shown in the below photo. Make sure the 57 1/2″ boards pocket holes are facing the inside.
Space the 27 1/4″ boards about 6″ part and attach the first and fourth board about 14 1/2″ up from the side board ends. Note, you will add the other 2 boards in soon, but not yet so you can easily fit your drill in the space and attach this bottom frame to the side frame in the next step.

5. ATTACH BOTTOM FRAME TO OUTDOOR COUCH SIDE FRAMES
Attach the bottom frame to the side frames using 2 1/2″ Kreg screws and 10″ up from the ground (as shown in photo below). It helps to place the side frame flat on the floor and have a second person hold up the bottom frame on top of it.

Once both side frames have been attached to the bottom frame, go ahead and add the last two 27 1/4″ boards on the bottom frame (from step #4). If it’s difficult to get them in place, use a hammer to tap them in place better.

6. ADD BACK FRAME BOARDS TO DIY OUTDOOR COUCH
Turn the outdoor couch on its side and use Kreg screws to attach the remaining three, 57 1/2″ boards to the side frames to create the back frame of the couch (space the boards about 2 3/4″ apart).

Flip your couch back up and your DIY outdoor couch build is finished yay!!!

7. FILL HOLES, SAND, AND STAIN
Fill the 4 screw holes and nail holes in with stainable wood filler. If you haven’t sanded your boards yet (I like to do most of my sanding before starting), go ahead and sand them well.
After staining, let your couch dry for a full 24 hours, then add the cushions, and enjoy!!!

Here’s another angle of it!

Komentar
Posting Komentar