4 Cozy Reading Nooks You’ll Want in Your Home Right Now Constructing a reading nook doesn’t have to be hard. Sometimes all you need is lots of pillows and a little unused space. Reading nooks are also a great way to use dead, unused, or awkward space within a home. Nooks can help maximize living space and provide additional seating, along with providing a personal sanctuary. With these four easy DIY reading nook projects, it won’t be long before you find yourself dreaming of getting lost in a good book. 1. Make Use of Dead Space with a Corner Bench Do you have a dead corner in your house that’s just…there? A great remedy for that empty space is a corner bench. Creating an L-shaped bench will maximize your space. Not only will it provide additional seating, but it can also become storage. Create this bench with bookshelves, cushions, and pillows for the ultimate reading nook space. When the bookshelves are placed together, you can then determine what size cushion you will need to go on ...
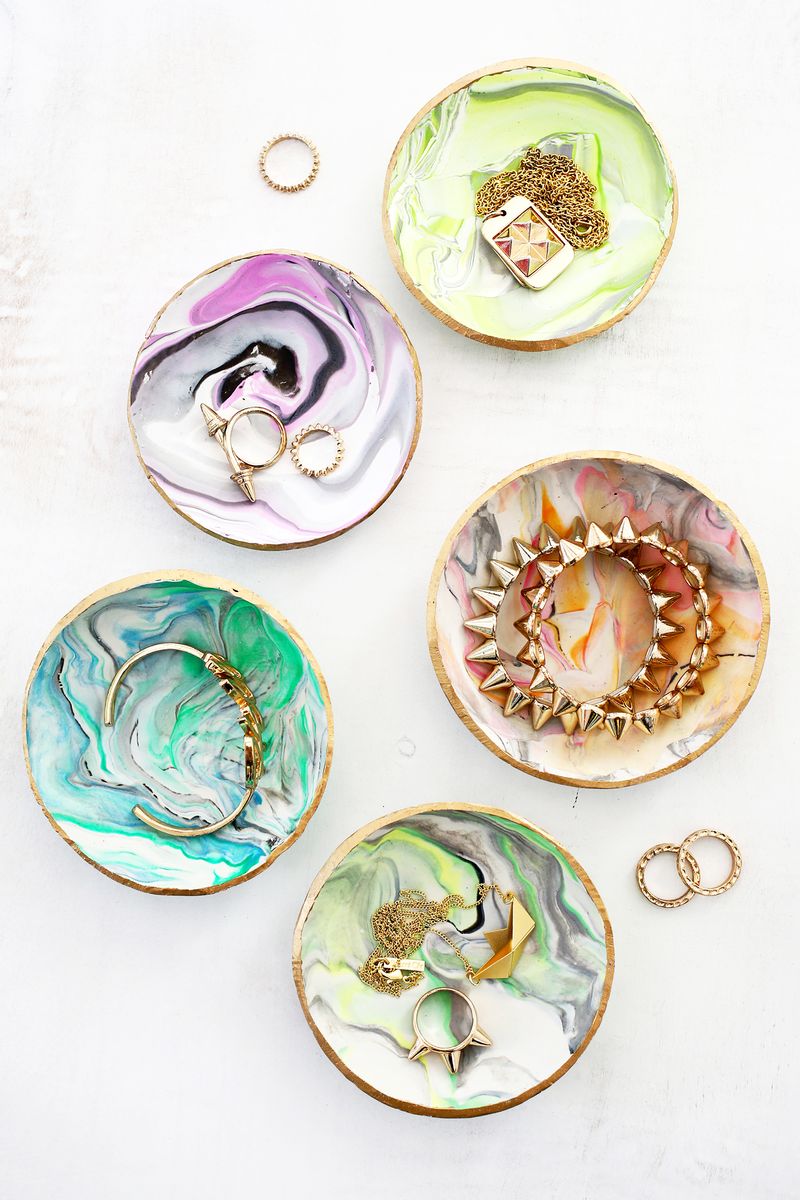
HOW TO MAKE DIY MARBLED CLAY RING DISH & SUPPLIES
–white, black, and colored oven bake clay (a few ounces of colored clay and the 1.75 pound white clay will make several dishes!)
-X-Acto knife or plastic clay knife
-small bowl or baking ramekin that is oven safe
–gold liquid gilding and small paintbrush
-rolling pin or large round jar
-large can or jar to trace around
–glaze to seal dish (optional)
-X-Acto knife or plastic clay knife
-small bowl or baking ramekin that is oven safe
–gold liquid gilding
-rolling pin or large round jar
-large can or jar to trace around
–glaze
")
2. Combine the smaller rolls into one big roll and twist together.
3. Roll the large twist into a snake about twice the original length to combine the colors. Twist the ends opposite ways after every few motions to give the colors more of a candy cane look. Once it’s twice the length, fold the snake in half and twist the two ends together, as pictured above. Repeat the rolling, folding, twisting, and rolling again process 2-3 times.
4. Smoosh all the clay into a ball. You want to see most of your colors on the surface of the ball, so pull the ball in half and re-smoosh together if you don’t.
5. Use a rolling pin or glass jar to roll out your marbled ball. I like to use a glass jar so I can see what is happening as I roll harder or softer over certain colors. The colors should blend together and create a marbled pattern as you roll over it. Try rolling different directions, from the edge, from the center, etc. to push the clay from different angles. Roll to 1/4″ thick.
6. Use a round item about 6″ wide as a template and cut out your dish circle with an X-Acto or clay knife.
7. Place your circle gently into a oven-safe bowl or ramekin that is a little smaller than your circle so it will sag a little in the center and give you more of a dish shape. Bake the bowl according to the temperature on the clay package (mine was 15 minutes at 275°F). Remove the bowl from the oven and allow the clay to cool before turning the larger bowl upside down and tapping lightly until the clay dish falls out.
8. Once the clay is completely cool, use a small brush to paint the rim of the dish and allow the paint to dry. Seal the dish with a glaze if you desire. The glaze won’t make the item food safe or totally waterproof, but it will give you a glossy finish if that’s what you’re into 🙂
")
")
While the color combinations are endless, my favorites were made with white, grey, black, and two bright colors that make a pretty third color when mixed. I would definitely suggest using a oven-bake clay like Sculpey that is already soft to start with. It will save you a lot of time and finger strength than if you use the clay that requires a lot of kneading to get it to that softness.
Source from here
Komentar
Posting Komentar