4 Cozy Reading Nooks You’ll Want in Your Home Right Now Constructing a reading nook doesn’t have to be hard. Sometimes all you need is lots of pillows and a little unused space. Reading nooks are also a great way to use dead, unused, or awkward space within a home. Nooks can help maximize living space and provide additional seating, along with providing a personal sanctuary. With these four easy DIY reading nook projects, it won’t be long before you find yourself dreaming of getting lost in a good book. 1. Make Use of Dead Space with a Corner Bench Do you have a dead corner in your house that’s just…there? A great remedy for that empty space is a corner bench. Creating an L-shaped bench will maximize your space. Not only will it provide additional seating, but it can also become storage. Create this bench with bookshelves, cushions, and pillows for the ultimate reading nook space. When the bookshelves are placed together, you can then determine what size cushion you will need to go on ...
DIY Braided Charm Bracelet

DIY Braided Charm Bracelet Supplies:
• Three skeins of embroidery thread
• Sewing needle and thread
• Jewelry clasp
• Scissors
• Jewelry pliers
• Jump rings
• Charms
• Clear nailpolish, optional (not shown)
Green Tip: take charms from broken or old jewelry and repurpose them with this fun bracelet.

Instructions:
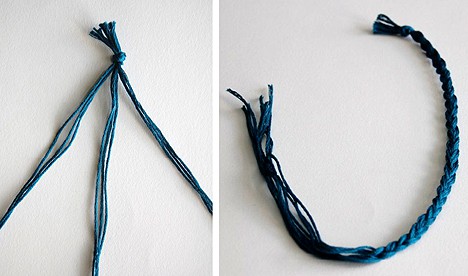
1) Measure your wrist, and multiply that by two. Cut nine strands of embroidery thread using this measurement, and tie them together.
2) Trim the ends if needed, and separate into three groups of three. Braid until you reach the length of your wrist plus a little extra.

3) Repeat with the two other colors. Group them together and tie together. Tie another knot where the braids end. Trim down if needed.

4) Using the jewelry pliers, attach jump rings to the strands of the bracelet. Then, attach charms. You can do this at random or set intervals – it’s up to you.

5) If you’d like the charms to stay in place, insert a jump ring straight through a braid.

6) When you’re done adding the charms, take some needle and thread and attach the jump ring to one end of the bracelet. Repeat with the other half of the clasp.

7) If you’d like, dab some clear nail polish on the knots for extra security.

And you’re done. I hope you enjoy customizing your own charm bracelets for wearing or gifting!
Source from here
Komentar
Posting Komentar