4 Cozy Reading Nooks You’ll Want in Your Home Right Now Constructing a reading nook doesn’t have to be hard. Sometimes all you need is lots of pillows and a little unused space. Reading nooks are also a great way to use dead, unused, or awkward space within a home. Nooks can help maximize living space and provide additional seating, along with providing a personal sanctuary. With these four easy DIY reading nook projects, it won’t be long before you find yourself dreaming of getting lost in a good book. 1. Make Use of Dead Space with a Corner Bench Do you have a dead corner in your house that’s just…there? A great remedy for that empty space is a corner bench. Creating an L-shaped bench will maximize your space. Not only will it provide additional seating, but it can also become storage. Create this bench with bookshelves, cushions, and pillows for the ultimate reading nook space. When the bookshelves are placed together, you can then determine what size cushion you will need to go on ...
DIY Crafty Boho Pillow Crochet Pattern
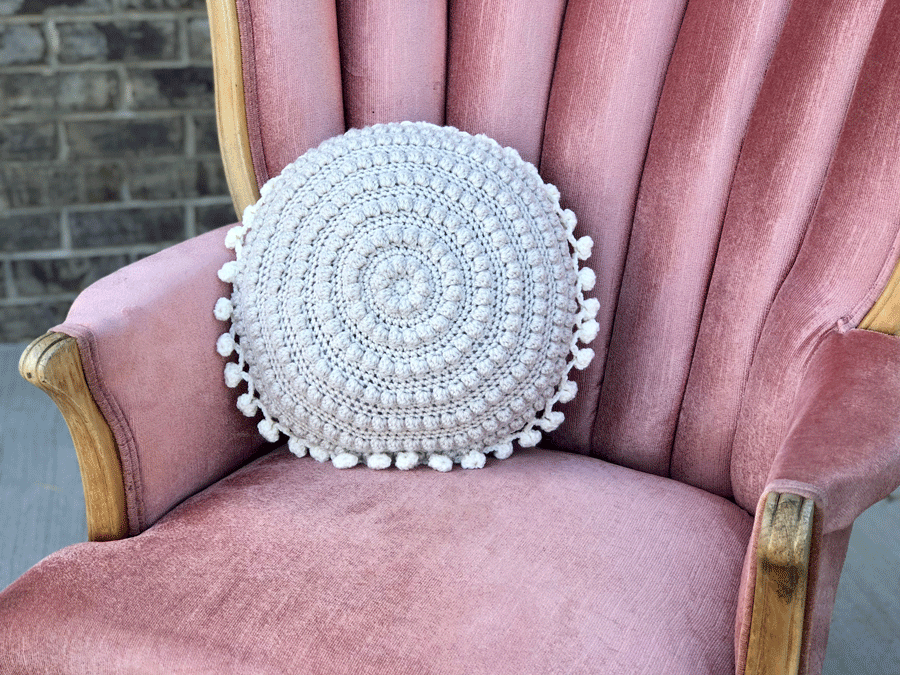
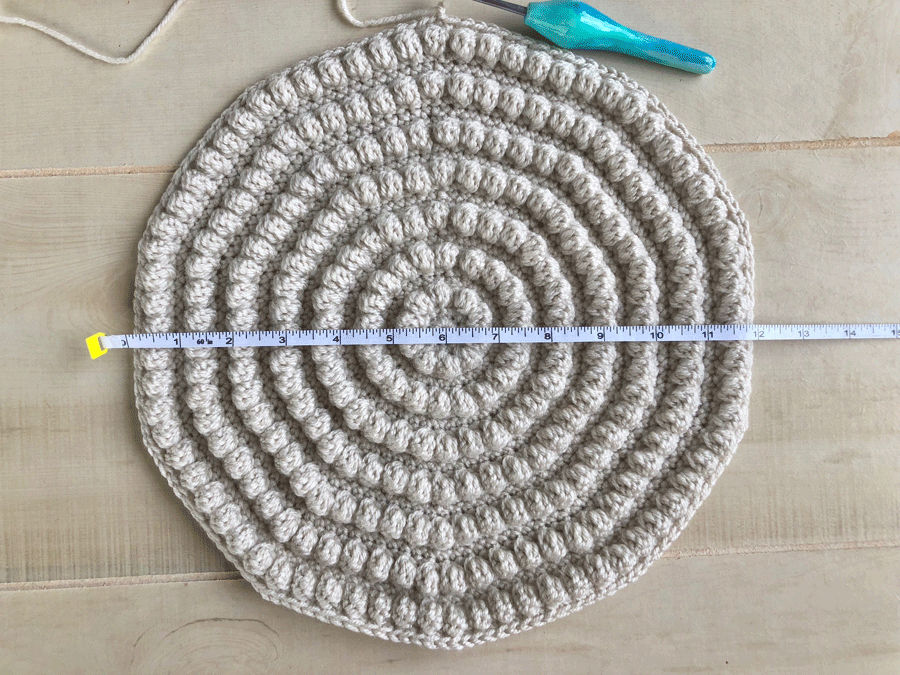
Finished Dimensions: About 14” in diameter.
Materials:
Stitch Key (US Terms)
SC = Single Crochet
CH = Chain
YO= Yarn Over
INC= Increase - Put two stitches in the same space. (In this case, it will be two SC stitches.)
SL ST= Slip Stitch
FSC= Foundation Single Crochet
*= To Be Repeated
Body- Front panel
With Linen yarn
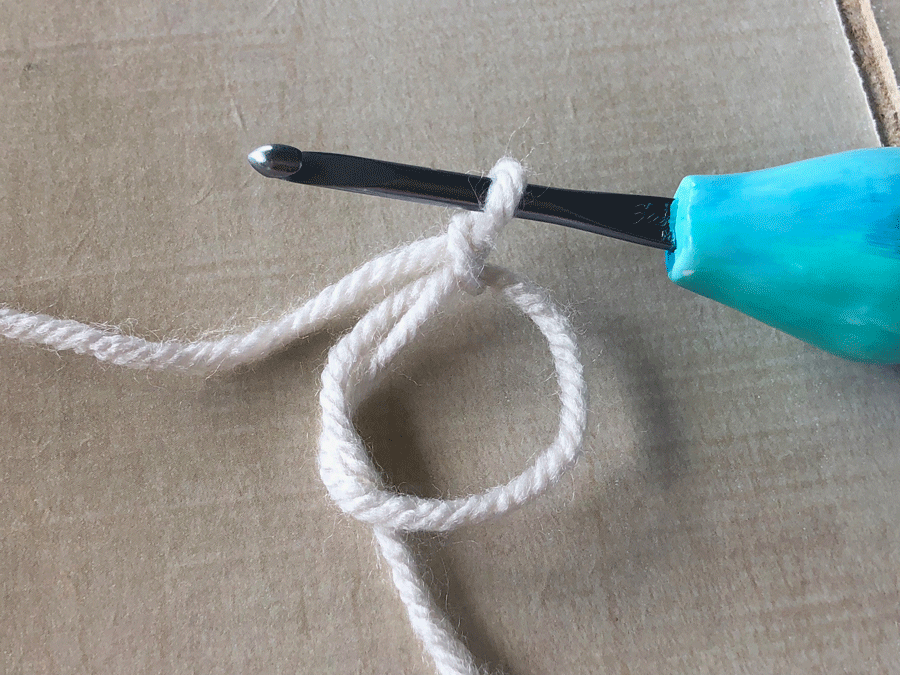
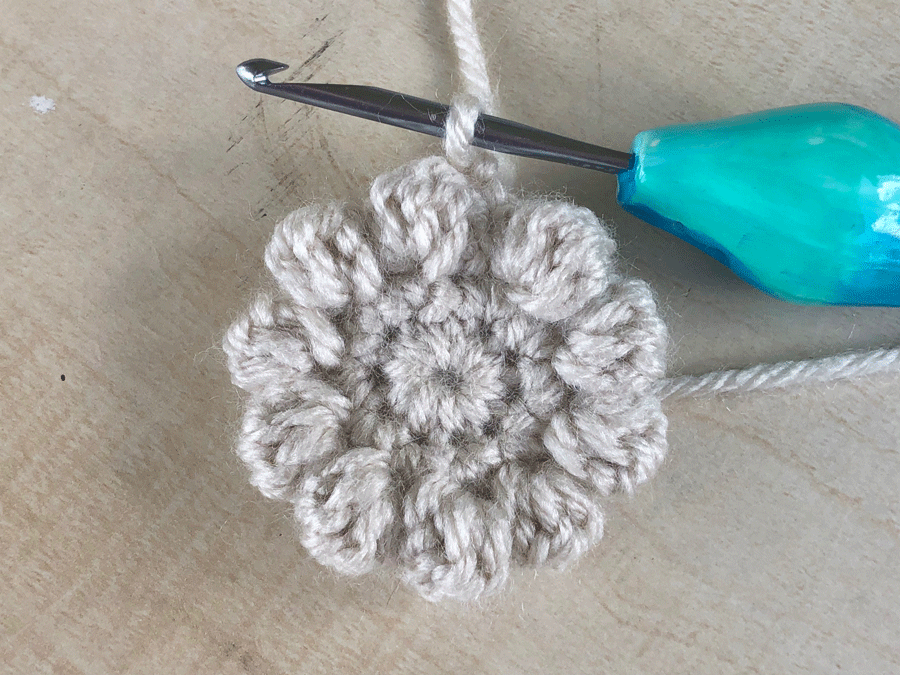
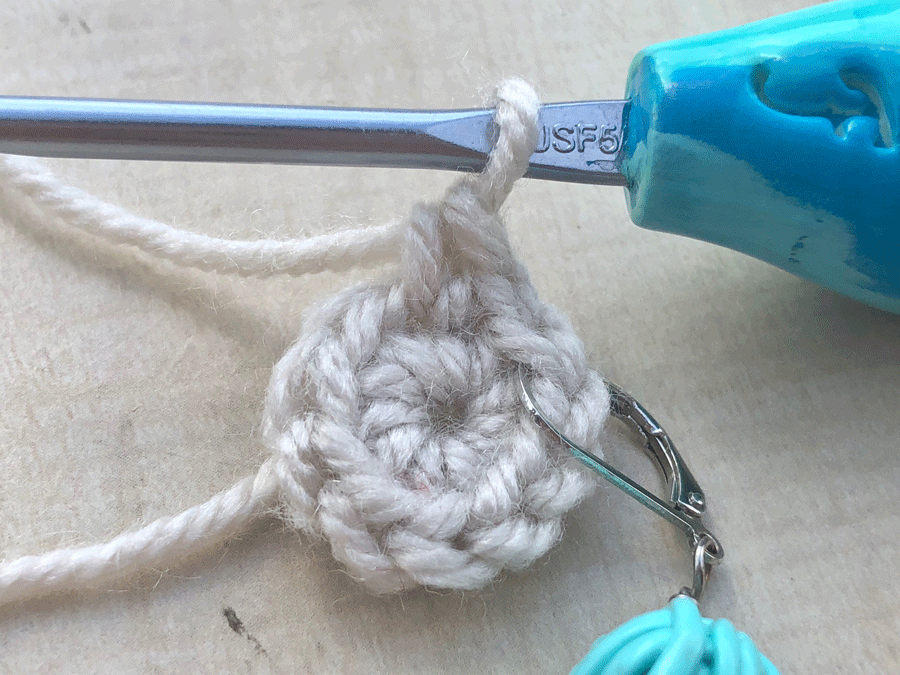
Row 1: SC 10 into a Magic Circle. Join back into the first SC, CH 1. (10)

Row 2: INC in each stitch around. Join back into the first SC, CH 1, turn.(20)
Row 3: *BOBBLE, SC* around. Join back into the first SC, CH 1, turn. (20)
Row 4: *INC, SC* around. Join back into the first SC, CH 1. (30)
Row 5: SC 30. Join back into the first SC, CH 1. (30)
Row 6: *INC, SC 2* around. Join back into the first SC, CH 1, turn (40)
Row 7: *BOBBLE, SC* around. Join back into the first SC, CH 1, turn. (40)
Row 8: *INC, SC 3* around. Join back into the first SC, CH 1. (50)
Row 9: SC 50. Join back into the first SC, CH 1. (50)
Row 10: *INC, SC 4* around. Join back into the first SC, CH 1, turn (60)
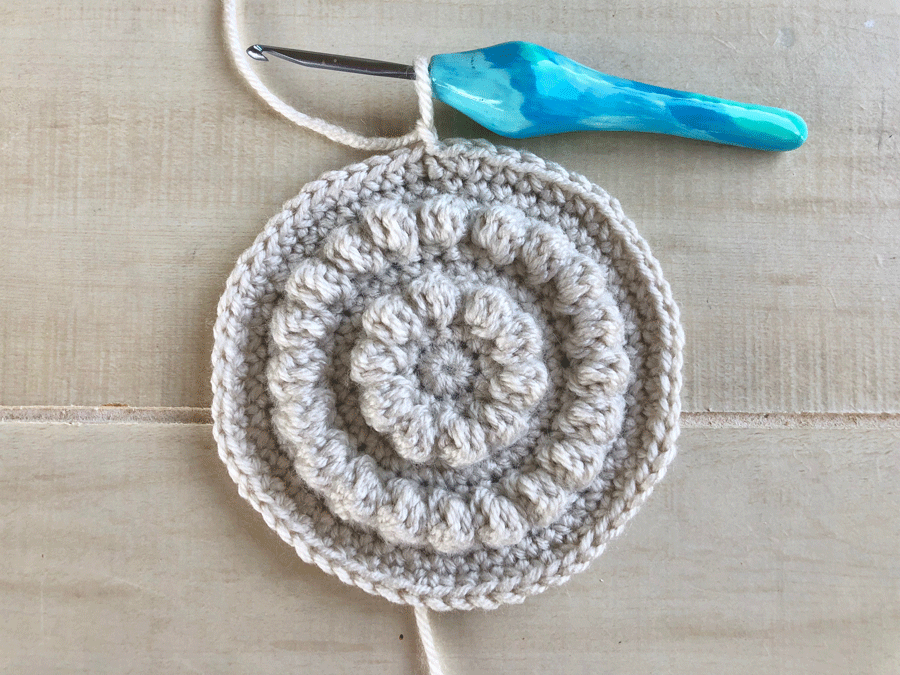
Row 11: *BOBBLE, SC* around. Join back into the first SC, CH 1, turn. (60)
Row 12: *INC, SC 5* around. Join back into the first SC, CH 1. (70)
Row 13: SC 70. Join back into the first SC, CH 1. (70)
Row 14: *INC, SC 6* around. Join back into the first SC, CH 1, turn (80)
Row 15: *BOBBLE, SC* around. Join back into the first SC, CH 1, turn. (80)
Row 16: *INC, SC 7* around. Join back into the first SC, CH 1. (90)
Row 17: SC 90. Join back into the first SC, CH 1. (90)
Row 18: *INC, SC 8* around. Join back into the first SC, CH 1, turn (100)
Row 19: *BOBBLE, SC* around. Join back into the first SC, CH 1, turn. (100)
Row 20: *INC, SC 9* around. Join back into the first SC, CH 1. (110)
Row 21: SC 110. Join back into the first SC, CH 1. (110)
Row 22: *INC, SC 10* around. Join back into the first SC, CH 1, turn (120)
Row 23: *BOBBLE, SC* around. Join back into the first SC, CH 1, turn. (120)
Row 24: *INC, SC 11* around. Join back into the first SC, CH 1. (130)
Row 25: SC 130. Join back into the first SC, CH 1. (130)
Row 26: *INC, SC 12* around. Join back into the first SC, CH 1, turn (140)
Row 27: *BOBBLE, SC* around. Join back into the first SC, CH 1, turn. (140)
Row 28: *INC, SC 13* around. Join back into the first SC, CH 1. (150)
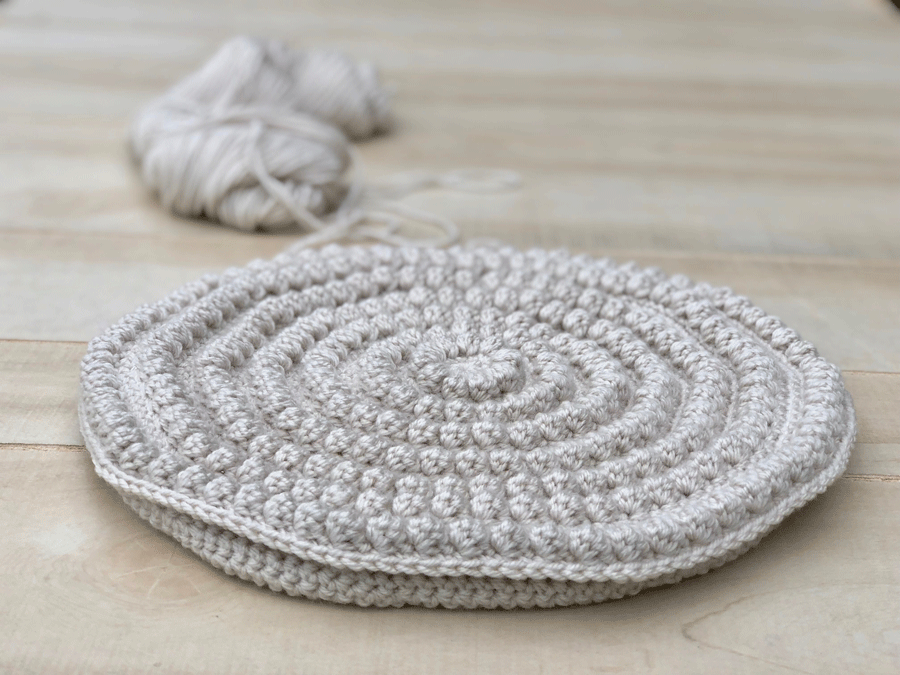
Tie off and sew in your loose ends.
Body: Back panel- Made in the round.
With Linen yarn
Round 1: SC 10 into a Magic Circle. Put a stitch marker in the 10th SC so you know where the next round will end. (10)
Continue putting the stitch marker in the last SC of each round so you know where the next round should end.
You next stitch will go directly on top of your first SC from round 1. You will continue like this for every round.
Round 2: INC in each stitch around. (20)
Round 3: SC 20. (20)
Round 4: *INC, SC* around. (30)
Round 5: SC 30. (30)
Round 6: *INC, SC 2* around. (40)
Round 7: SC 40 (40)
Round 8: *INC, SC 3* around (50)
Round 9: SC 50 (50)
Round 10: *INC, SC 4* around (60)
Round 11: SC 60 (60)
Round 12: *INC, SC 5* around (70)
Round 13: SC 70 (70)
Round 14: *INC, SC 6* around (80)
Round 15: SC 80 (80)
Round 16: *INC, SC 7* around (90)
Round 17: SC 90 (90)
Round 18: *INC, SC 8* around (100)
Round 19: SC 100 (100)
Round 20: *INC, SC 9* around (110)
Round 21: SC 110 (110)
Round 22: *INC, SC 10* around (120)
Round 23: SC 120 (120)
Round 24: *INC, SC 11* around (130)
Round 25: SC 130 (130)
Round 26: *INC, SC 12* around (140)
Round 27: SC 140 (140)
Round 28: *INC, SC 13* around (150)
CraftyBohoPillow_Photo 8
Do not tie off.
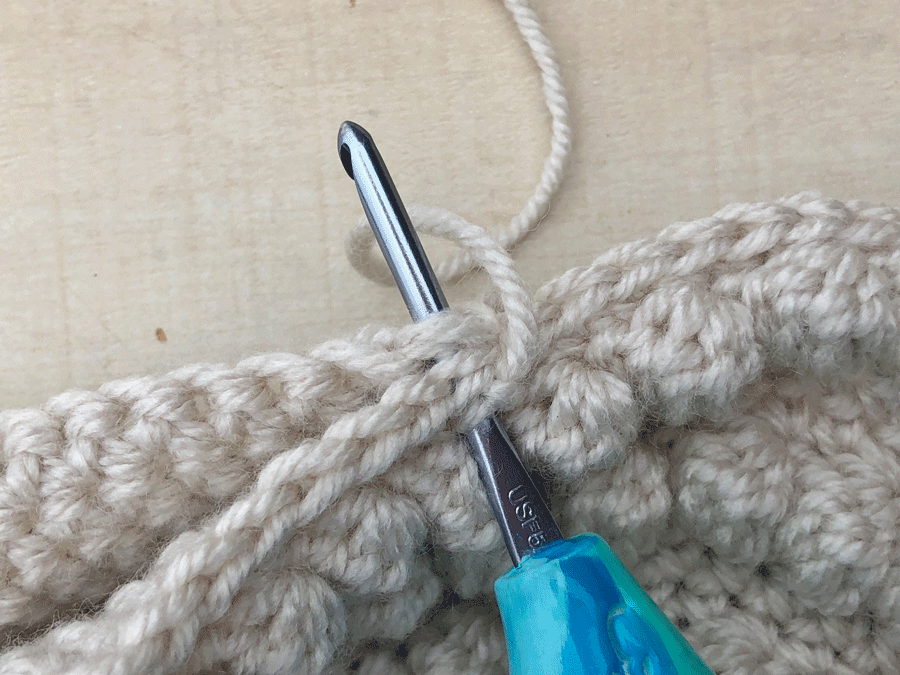
Sew in the first tail from round 1.
Remove your hook from the last stitch in round 28, lay the bottom piece of your pillow wrong side up and place the top piece on top, right side up. You bottom piece may be curling up on the edges but it wont matter once you attach your pieces and stuff your pillow. Insert your hook into one of the stitches on your top piece, grab your loop from the back piece, and pull through.
CH 1 to secure.

Starting in the same space where you just joined, begin to SC around, making sure to line up the stitches and go through both the front and back panels of the pillow. Once the pillow is about 3/4 of the way joined, stuff your pillow with poly fill. Continue to SC around the rest of the way until you have lined up and joined all 150 stitches. Join back into your first SC and tie off. Sew in the tail.
Shape your pillow by massaging it and adjusting the polyfill. If you wanted your pillow to be more “shapely” you could use a round pillow insert instead of polyfill.
Pom Pom Trim
Insert your hook into one of your stitches, grab your cream yarn and pull through.
CH 7, BOBBLE into the back bump of the third CH from your hook , CH 3, BOBBLE into the third CH from hook (the top of your first bobble), CH 1 to secure, slip stitch back into the bottom of the first bobble, CH 4, skip 4 stitches and slip stitch into the 5th stitch. Repeat around.
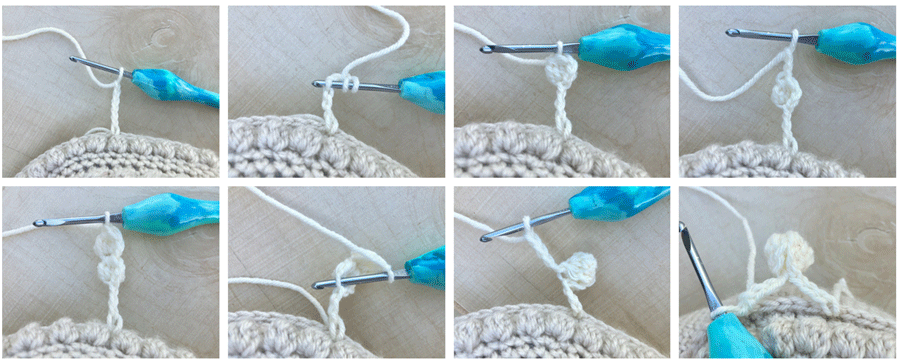
You may need to adjust/shape your “pom poms”.
Komentar
Posting Komentar